For my lab, I run everything nested within VMWare workstation, which is running on a single Dell physical host that runs Windows for the base OS. Over the past couple of months, I’ve been trying to spend a bit more time in the lab, mostly for learning some components of the vSphere environment I’m not familiar with, but also as a test area. I deliberately started the environment with a single embedded deployment, so the PSC and VC server was running on the one node. I also made the decision to run the lab with the appliance. We run the appliance in production, and it is clear that this is the preferred deployment method from VMWare.
In a previous post I went through the process of deploying an external PSC to the environment, and reconfiguring the vCenter Server on the embedded node to the external PSC.
In this post, I will detail the steps I took to deploy a second external PSC to the environment. The plan for this PSC is:
- To join it to the same SSO domain (vsphere.local) as the first PSC
- To join it into a new SSO domain site (Site2)
- To simulate a multi-site deployment, where each site has 1 VC server and 1 external PSC, all in the same SSO domain
- To create a new VC server in site 2 and point it to this newly deployed PSC node (next steps)
A quick summary of the environment:
- PSC01 - Platform Services Controller node in vsphere.local site1
- VC01 - vCenter Server node pointed to PSC01
- PSC02 - Being added in this article, will be Platform Services Controller node in vSphere.local site2
- DC01 - Windows Active Directory Domain Controller
The machine indicated by the red arrow is the one I’ll be deploying now. VC02 to come soon.

The steps I followed as a summary are:
- Take snapshots of the existing environment prior to any changes being made
- Add DNS entry for new node prior to deployment
- Import the vmware-vcsa OVA into VMWare Workstation
- Make changes to the virtual machine configuration file
- Change the network of the virtual machine in the nested environment
- Power on the PSC
- Check the vsphere.local domain using jxplorer after deployment
- Check the health of the new PSC in the vCenter Web Client
- Join the new PSC to the Active Directory Domain
Snapshots
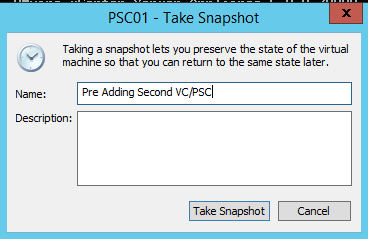
The first step was simply to take snapshots of the existing VC and PSC nodes, in case anything went wrong with the new PSC deployment and I had to roll back.
DNS
As per best practices, I then added an A record into DNS in my nested environment for the new PSC node - psc02.lab.allford.id.au. DNS in my environment is running on the Windows AD DC, so I’ve simply added a new A record into the lab.allford.id.au zone with powershell:
Enter-PSSession DC01
Add-DnsServerResourceRecordA -ZoneName lab.allford.id.au -Name psc02 -IPv4Address 192.168.0.61
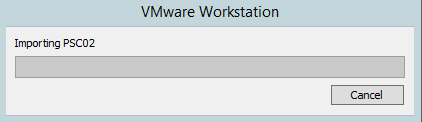
Import VCSA OVA
The steps for deploying appliance nodes into VMWare workstation have been blogged about many times, so I’m linking off to a post on virten.net for some instructions.
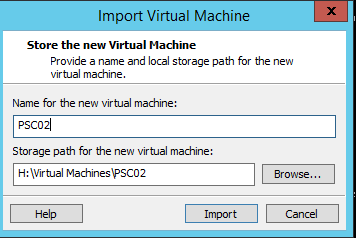
After the machine has been imported into VMWare workstation, do not power it on! Some further changes need to be made to the virtual machine configuration file, as the nodes configure themselves on first time boot up using the settings added to the configuration file.
Edit .VMX File
Browse to the location where you have deployed the machine to, and you will find a file in the root directory named .vmx. In my instance, this is psc02.vmx. Open the file in notepad and add in some extra configuration lines depending on your requirements. A full list of the OVA options can be seen at the virten.net link above.
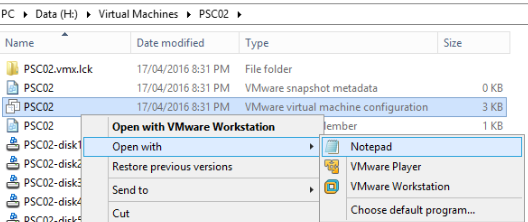
The changes I made to my node are below. Some of the key lines for this specific deployment type are in red.
guestinfo.cis.deployment.node.type = "infrastructure"
guestinfo.cis.vmdir.site-name = "Site2"
guestinfo.cis.vmdir.domain-name = "vsphere.local"
guestinfo.cis.vmdir.password = "password"
guestinfo.cis.vmdir.first-instance = "false"
guestinfo.cis.vmdir.replication-partner-hostname = "psc01.lab.allford.id.au"
guestinfo.cis.appliance.net.addr.family = "ipv4"
guestinfo.cis.appliance.net.addr = "192.168.0.61"
guestinfo.cis.appliance.net.pnid = "PSC02.lab.allford.id.au"
guestinfo.cis.appliance.net.prefix = "24"
guestinfo.cis.appliance.net.mode = "static"
guestinfo.cis.appliance.ntp.servers = "192.168.0.10"
guestinfo.cis.appliance.net.dns.servers = "192.168.0.10"
guestinfo.cis.appliance.net.gateway = "192.168.0.1"
guestinfo.cis.appliance.root.passwd = "password"
guestinfo.cis.appliance.ssh.enabled = "true"
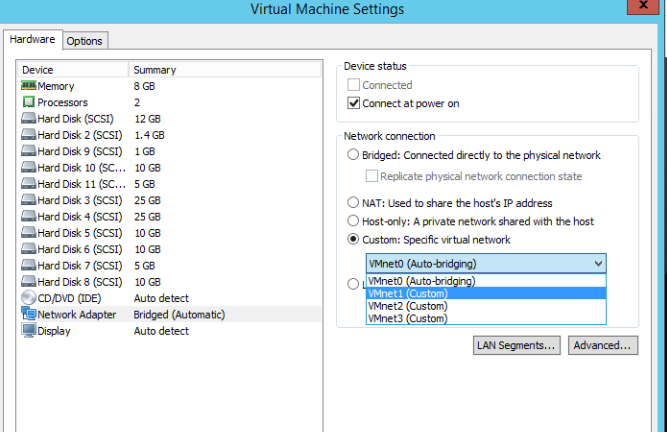
Change Network for VM
In my lab, I have a number of virtual networks defined in VMWare workstation. VMnet1 is my main management network, VMnet2 is for IP storage, VMnet3 is for vMotion. Before powering on the node, I need to make sure it is joined to the VMnet1 network so it can connect to the existing nodes during initial deployment.
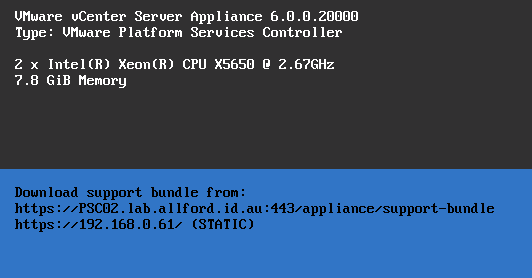
Power On
It is now time to power on the node within VMWare workstation. As usual with the deployment of the appliance, you will just see a VMWare splash screen with a loading bar until the node has been deployed. With any luck, you will see the DCUI with no first boot errors being recorded, which looks like this:
Health Checking
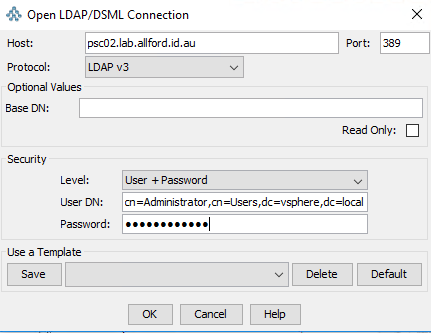
After making a major change like this, I like to do a few basic checks to make sure everything is behaving as expected within the environment. The first thing was to check the vsphere.local configuration using JXplorer. JXplorer is a free utility that can be used to connect to and browse ldap directories, including the VMWare Directory Service. After downloaing, launch the JXplorer utility and click File > Connect. You will need the following information to connect:
- Host: Platform Services Controller node name
- Level: User + Password
- User DN: cn=Administrator,cn=Users,dc=vsphere,dc=local
- Password: Password for the account above
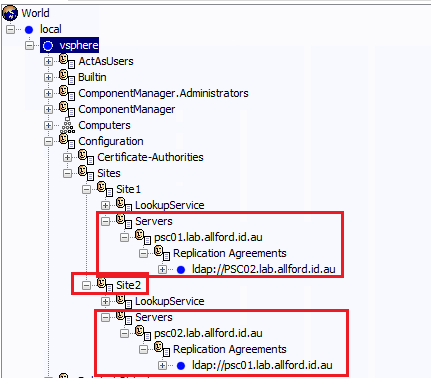
After connecting, there is one main area I want to check. I want to make sure that a new Site has been created (site2), the new PSC is a server within site 2 and a replication agreement has been configured with the original PSC01 node. I also want to make sure there is a replication agreement in place from the original PSC01 node to the new PSC02 node.
This information can be found under local > vsphere > Configuration > sites. All is looking good.
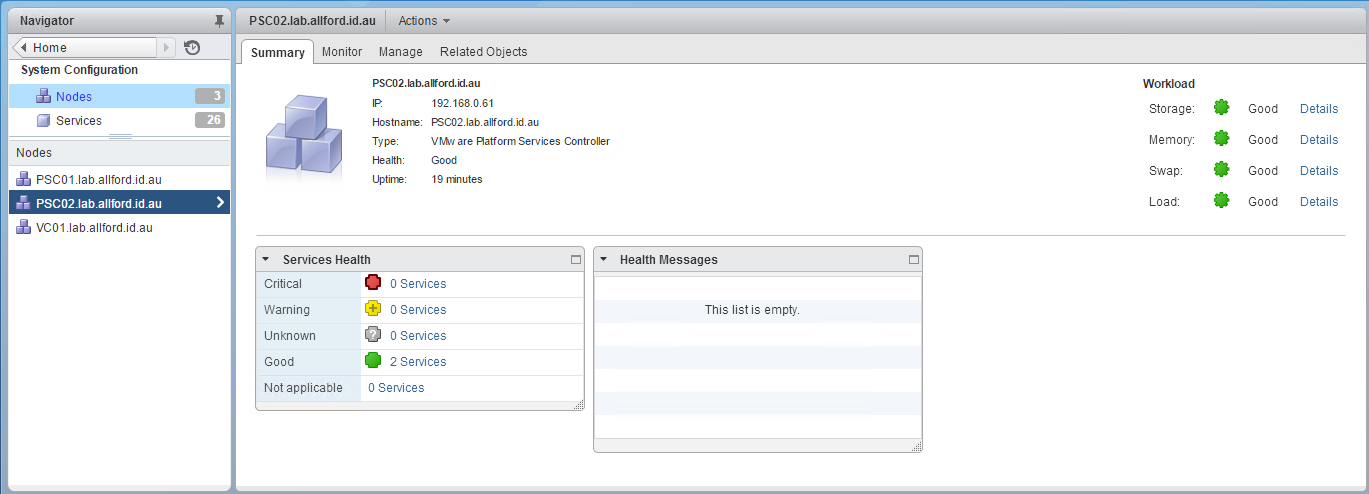
My final check is to log into the vCenter Web Client with the [email protected] account, and make sure the new PSC is appearing as a node and the health checks are reporting as all good. This information can be found in the web client by going to Home > Administration > System Configuration (Under Deployment) > Nodes. As per the screenshot below, everything is looking great.
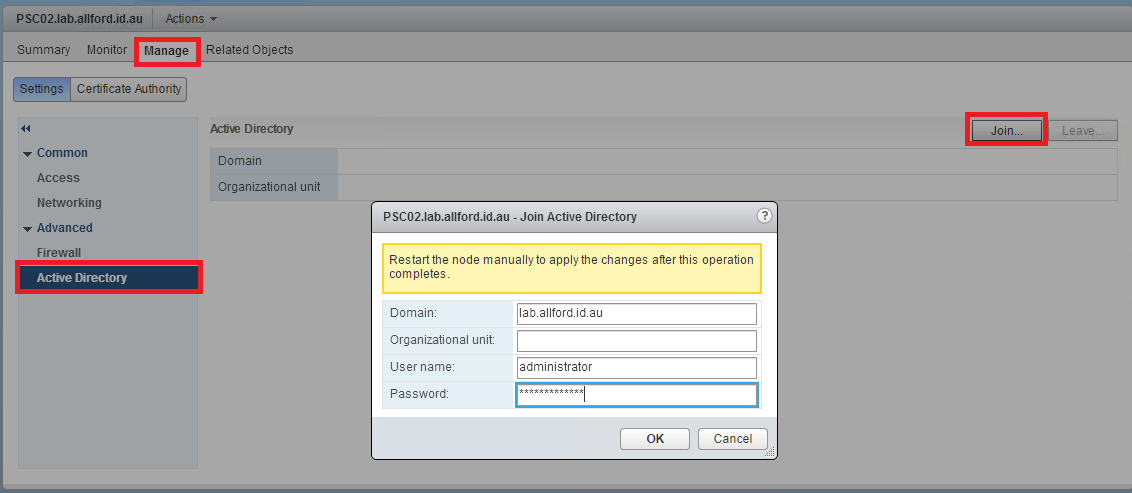
Join PSC to Active Directory
My final task is to join the new PSC to Active Directory. From the screen we were on above in the web client, simply click on the Manage tab > Active Directory > Join. A window appears prompting for information for Active Directory. More information on joining a node to AD can be found at the VMWare Documentation Center.
In the current build of vCenter (6.0U2), after you click on OK, there is no indication that the node has been successfully joined to Active Directory, and the information remains blank in the web client. As long as there we no errors, this is OK. As prompted, restart the PSC node. After the restart, the AD information will be populated.
Summary
Hopefully this post has clearly outlined the steps required to add a new external PSC node running the VMWare appliance into a nested environment running on top of VMWare Workstation.
As mentioned, I’m planning to deploy another vCenter Server into ‘site2’, so I’ll be sure to document those steps and drop the information into a blog post soon.
If you have any questions, please be sure to let me know!