Introduction
The VMware vCenter Support Assistant is a free plugin made available by VMware in the form of a virtual appliance. After deploying the appliance, it can be registered to vSphere SSO and you can authorise one or more vCenter Servers to Support Assistant. Support Assistant provides the following benefits:
Reactive support. You can use the Support Assistant plugin in the vSphere Web Client to easily create new service requests (SRs), as it is essentially a front end to the MyVMware portal. The big benefit of lodging the SR through Support Assistant is that you get the chance to automatically gather logs for different entities in your environment and these logs are automatically generated and uploaded to VMware as a background task. You can also manage existing SRs through support assistant to add comments, upload files or generate more logs
Proactive Support. VMware promote the fact that the Support Assistant can provide proactive monitoring of the environment. The idea here is that the Support Assistant appliance periodically collects information from the environment and uploads its to VMware. The data is then automatically analysed and you get notified of any potential problems. This is usually done in the form of a regular summary email once a month, but you can also manually review the issues via the plugin, and there is also an option to have certain alarms triggered in vCenter if a critical issue is found.
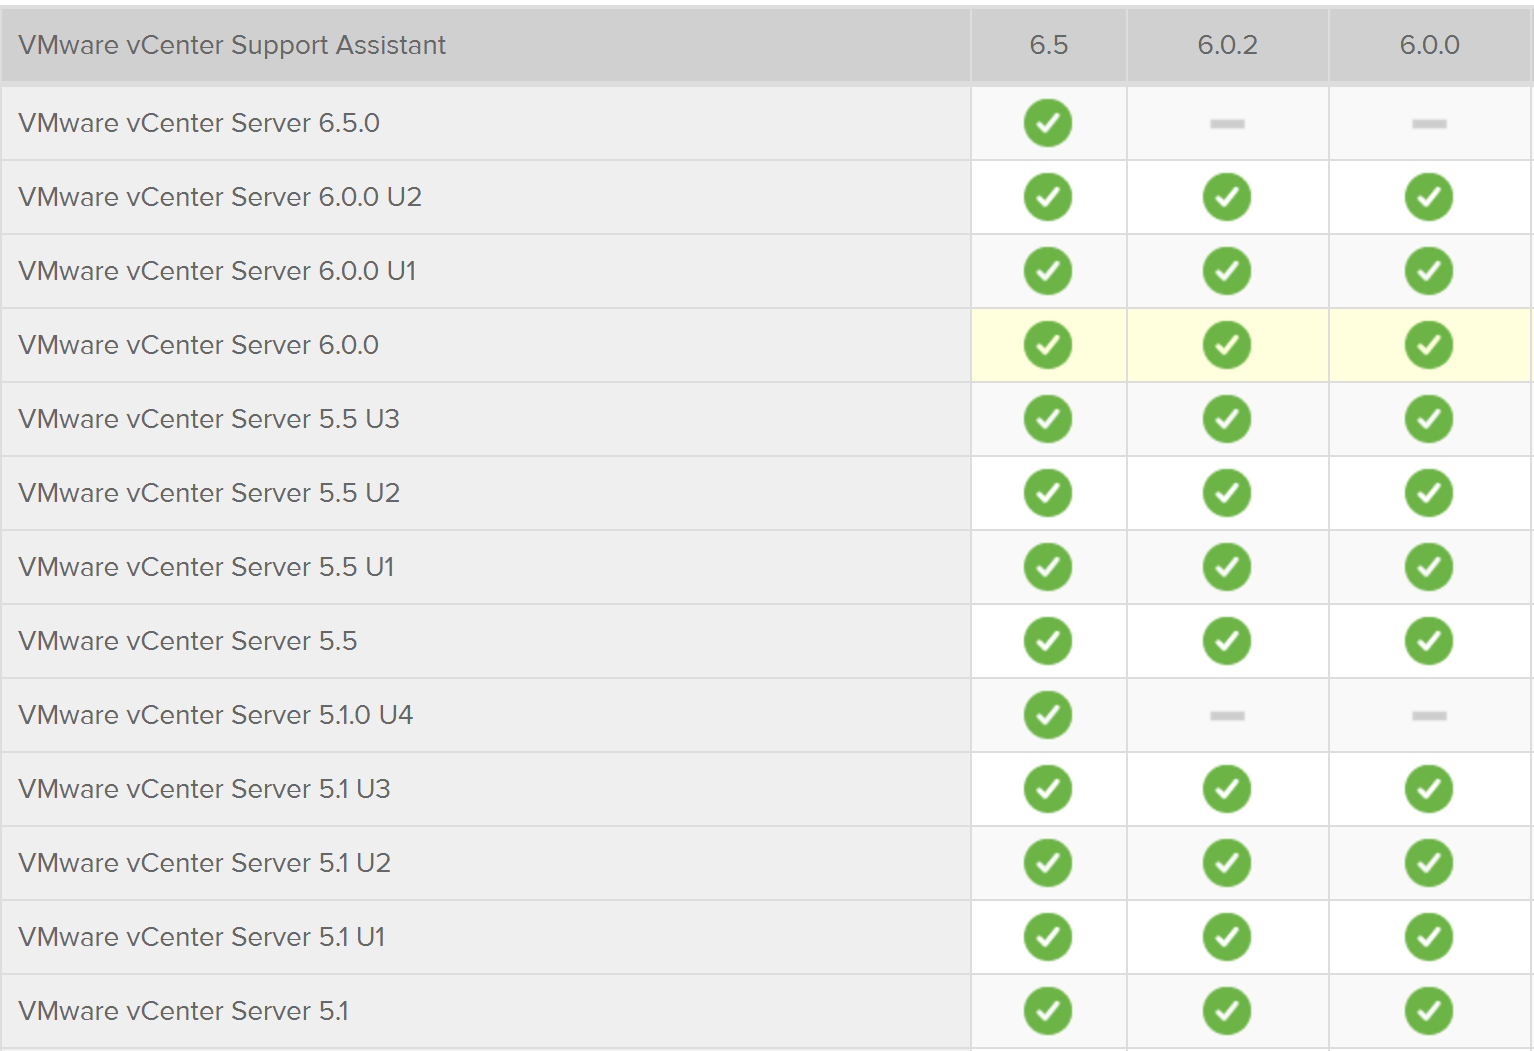
On the 2nd of Feb 2017, VMware released a new build of the Support Assistant appliance; VMware vCenter Support Assistant 6.5. This brings support for connecting to vCenter 6.5, which the previous builds did not have support for.
Support Assistant 6.5 actually has a good depth for backwards compatability, so it is probably worth looking at upgrading or deploying even if you are running an earlier version of vSphere.
I’ve put together a video which describes the Support Assistant appliance and also walks through the deployment of Support Assistant 6.5 in a vSphere 6.5 environment.
The video has been recorded in 1080P so best to enjoy in full screen!
Downloading and Deploying Support Assistant
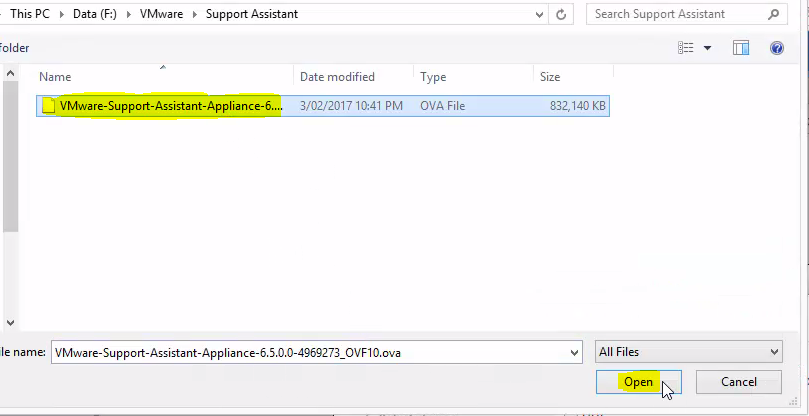
The Support Assistant is downloaded as an OVA that you deploy into your environment, and the download can be found here. Note that you’ll need to log in with a valid MyVMware account.
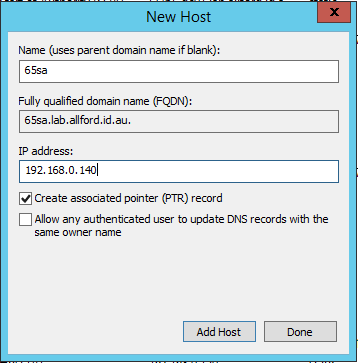
As always, I like to get a DNS entry in place for any new VMware appliance being deployed. I have AD DNS in my lab, so I’ve gone ahead and created an A record in DNS for my appliance which will be names 65SA at the IP 192.168.0.140.
After DNS is set up it is time to jump in and deploy the appliance.
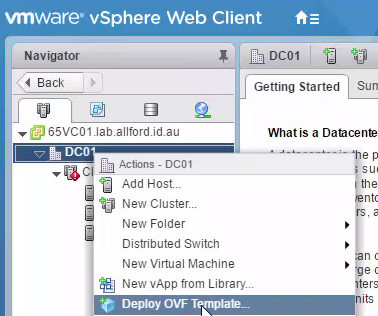
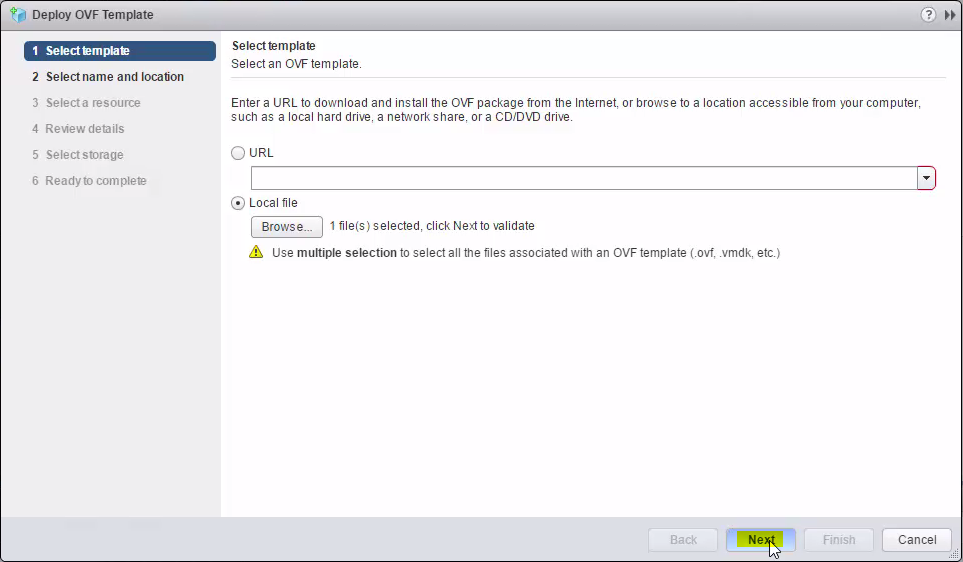
Log into the vSphere Web client and right click on any object in your environment and select Deploy OVF Template.
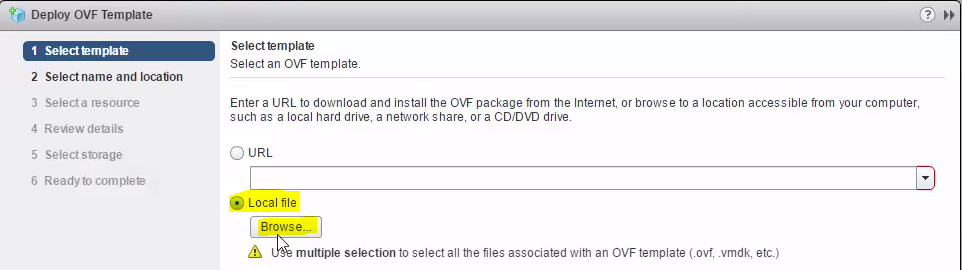
In the select template section, select Local File and click Browse and select the OVA downloaded from MYVMware earlier and click Next through the wizard.
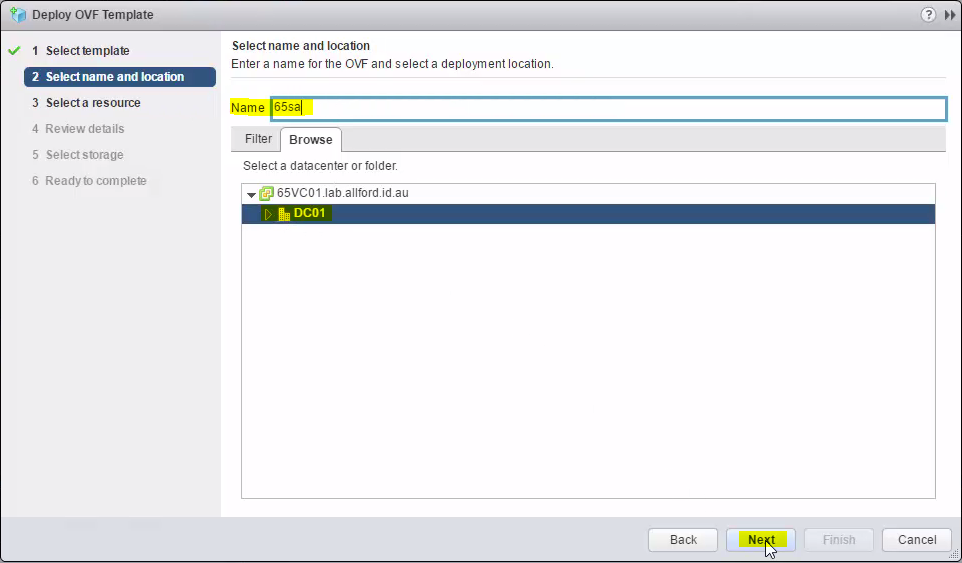
Give the appliance a name for the vCenter inventory and select a location to place the VM.
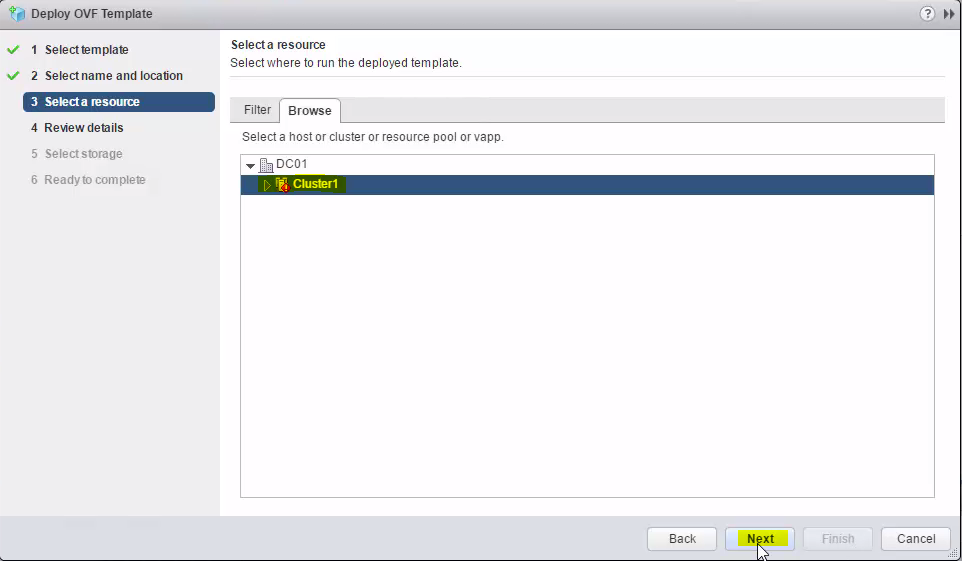
Select a resource to deploy the appliance on to. In my environment I have 3 hosts in the cluster ‘Cluster1’, so I am going to choose to deploy it to the cluster.
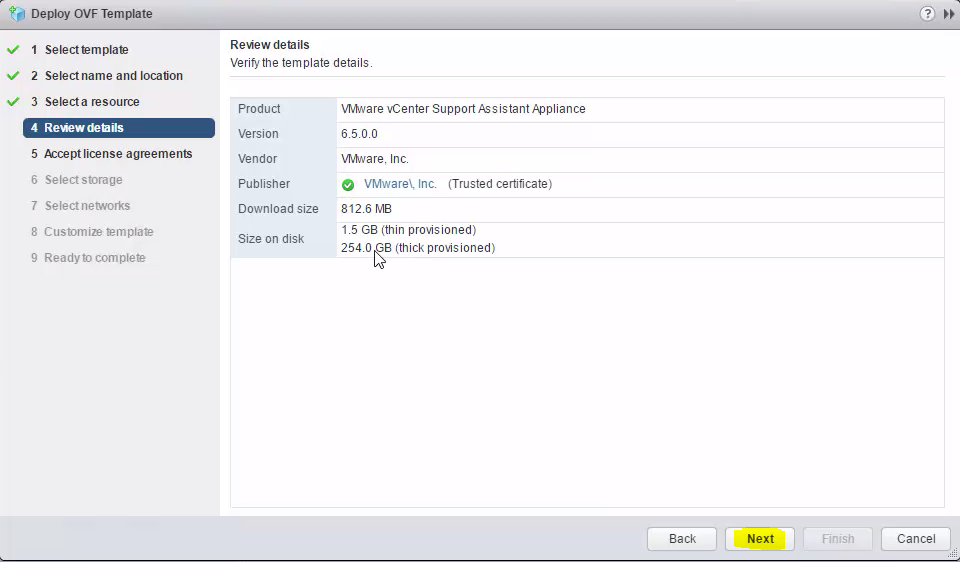
Review the details provided after the OVA has been verified and click Next to proceed.
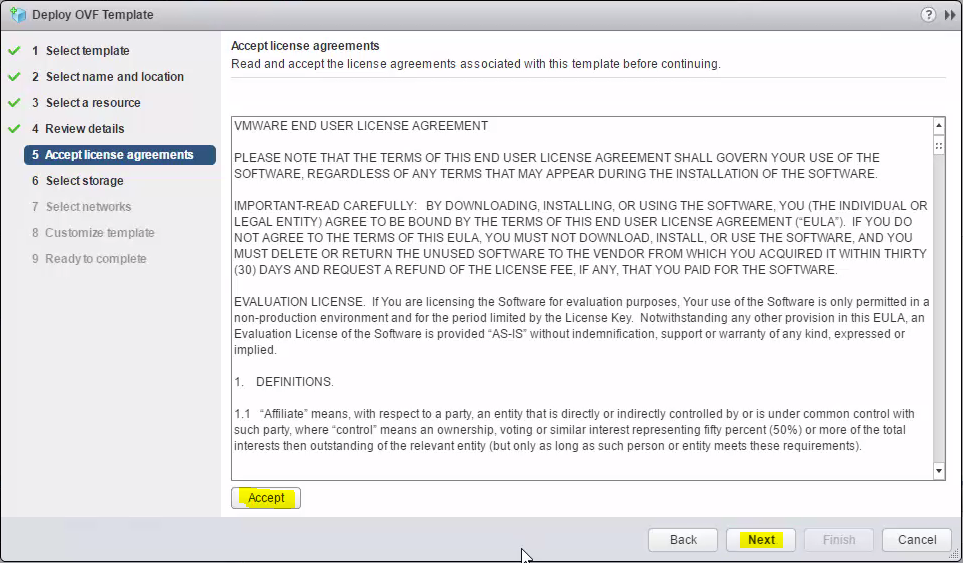
Accept the End User License Agreement and click Next.
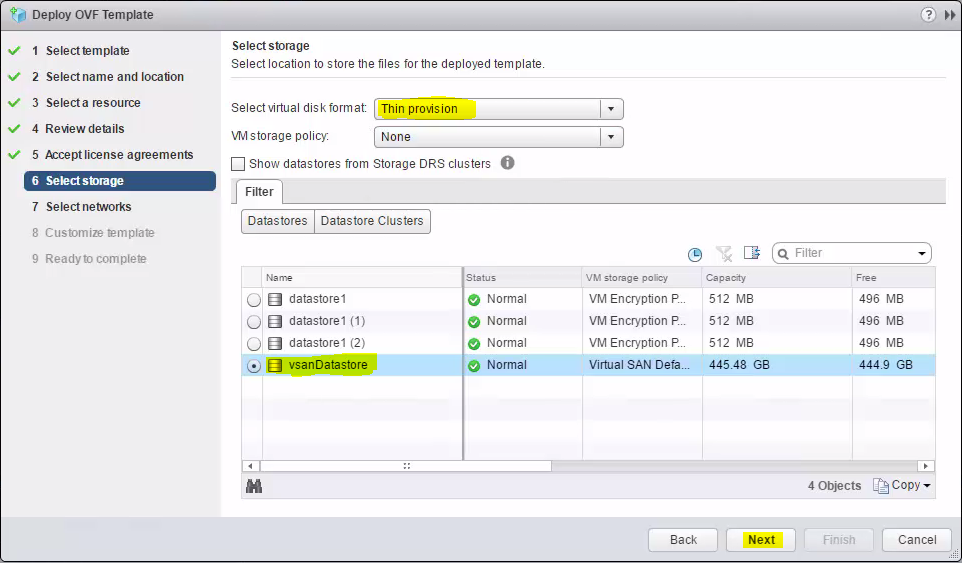
Choose which datastore to deploy the appliance on to and optionally change the disk format. I’ve changed it to thin provision in my lab.
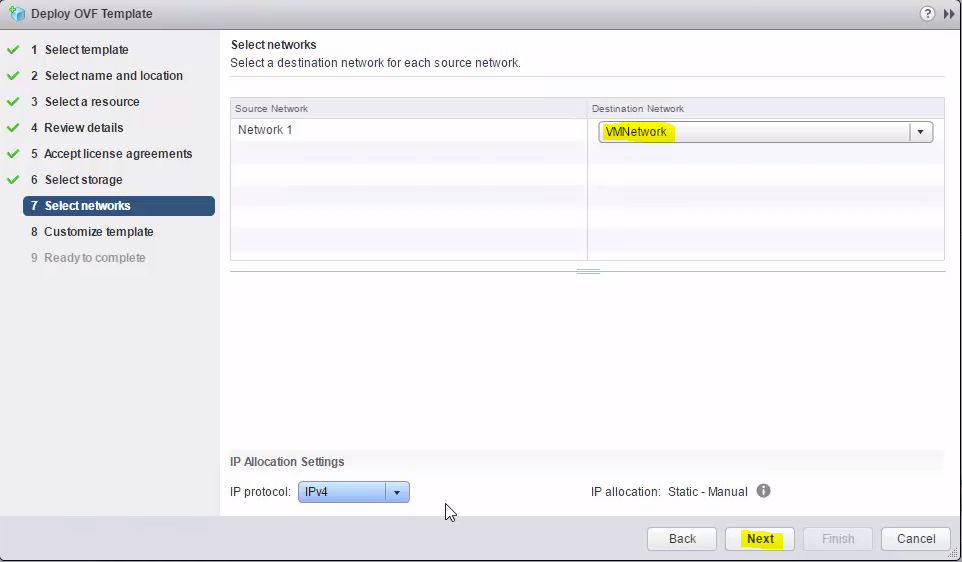
Select the network to join the appliance to and click Next.
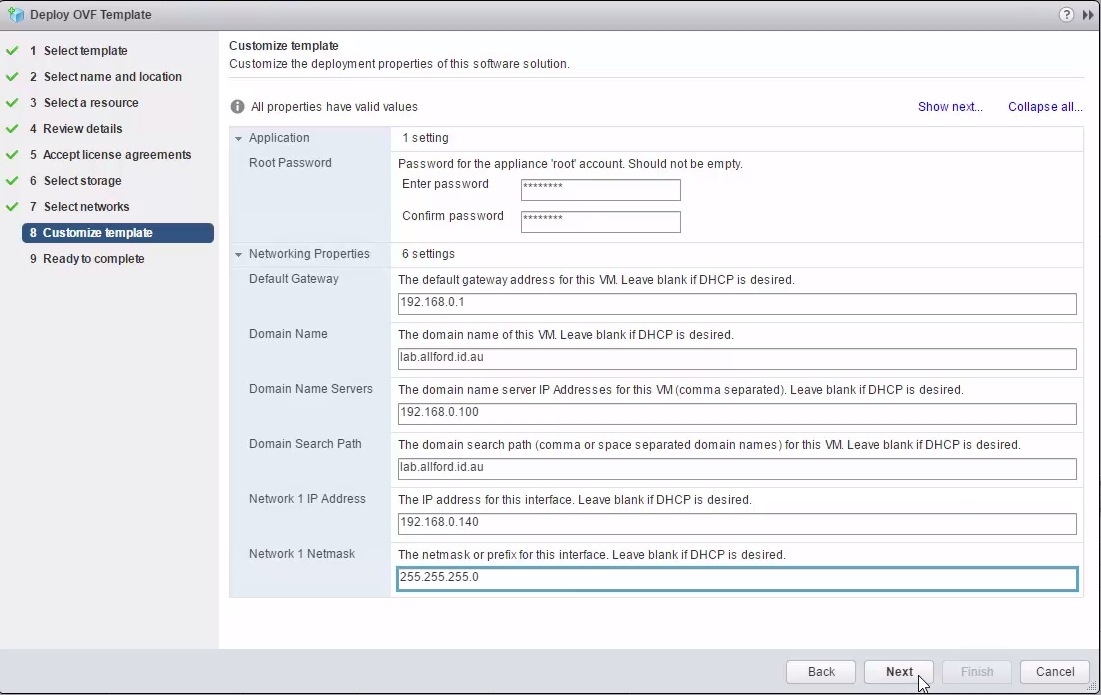
On this screen you are asked to enter a number of options.
Firstly, you need to enter a password twice that will be for the root account of the appliance.
Secondly, you will be asked to enter network details for the appliance. This includes Default Gateway, Domain Name, DNS Servers, IP address and subnet mask for the appliance. After all of these details are entered, click Next. you will be provided a summary screen where you can review your options and then click Finish to proceed with the deployment.
After the appliance has been deployed, power it on and allow it to run through the initial configuration which takes around 5 minutes.
You should now have a virtual appliance running in your vSphere environment. The next step is to log into the local Web UI of the appliance and configure it.
Initial Configuration and Registration to vCenter
Following the deployment appliance, you now need to log in to the local UI of the appliance to register it to vSphere SSO and authorise vCenter.
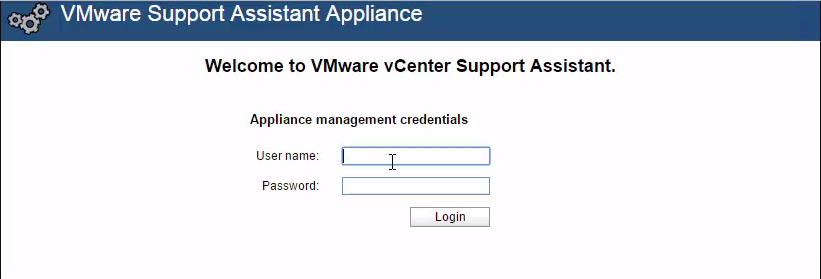
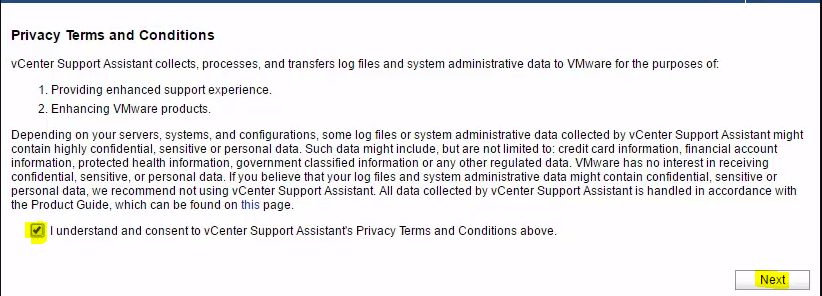
Browse to the DNS record or the IP address of the appliance and log in with ‘root’ as the username and the password you configured during appliance deployment, followed by accepting the Privacy Terms and Conditions.
The first step to take is to enter the lookup service address. If you have an embedded vSphere 6/6.5 deployment, this is the FQDN / IP of your node on port 7444. If you have an external deployment, this is the FQDN / IP of one of your PSC nodes on port 7444. In the example below, I’ve entered the FQDN of my external PSC.

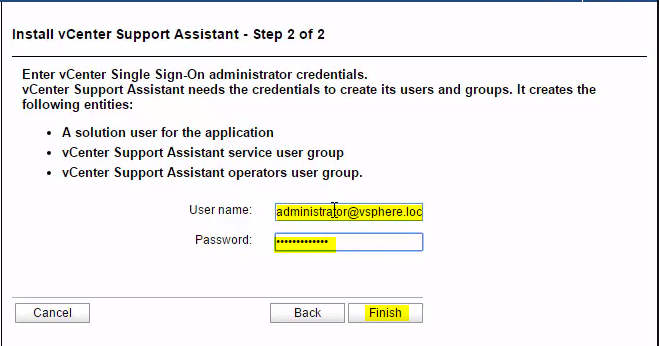
After you’ve entered the lookup address, you need to enter the SSO administrator credentials. In my environment this is [email protected] as I’ve used the default domain of vsphere.local. As noted, this process will create some object in the environment to allow Support Assistant integration.
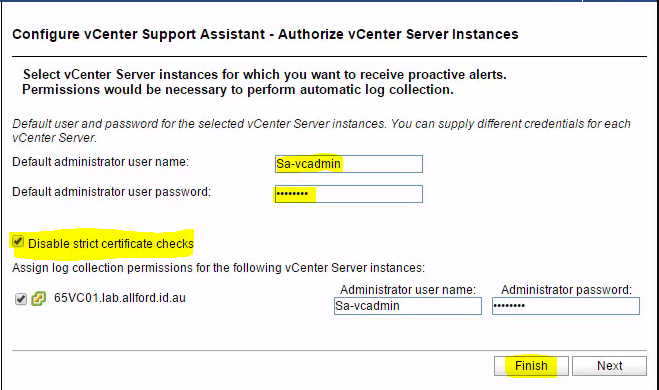
We’re now asked to authorise vCenter Servers that this Support Assistant appliance will be integrated with. vCenter Servers found in your SSO domain are automatically populated at the bottom of the screen, in my environment I only have one vCenter Server.
The following screen asks for credentials for the ‘default administrator’ of vCenter Server, which in my opinion is not very descriptive. I believe that this account is used to create the vCenter alarms and to create the role in the vCenter Server for Support Assistant, and then the account is not used again. I’m looking to seek clarification on what privileges within vCenter that this account required and will update this post when I have that information.
I’ve gone ahead and used an account that has the administrator role on my vCenter Server.
I’ve also disabled strict certificate name checking as I don’t have trusted certs in this environment.
If you are looking to authorise more than one vCenter Server and need to use different credentials for each vCenter Server, you can uncheck the box next to the vCenter Server object and then enter in credentials for the specific vCenter Server as required. Click on Next to begin the authorisation.
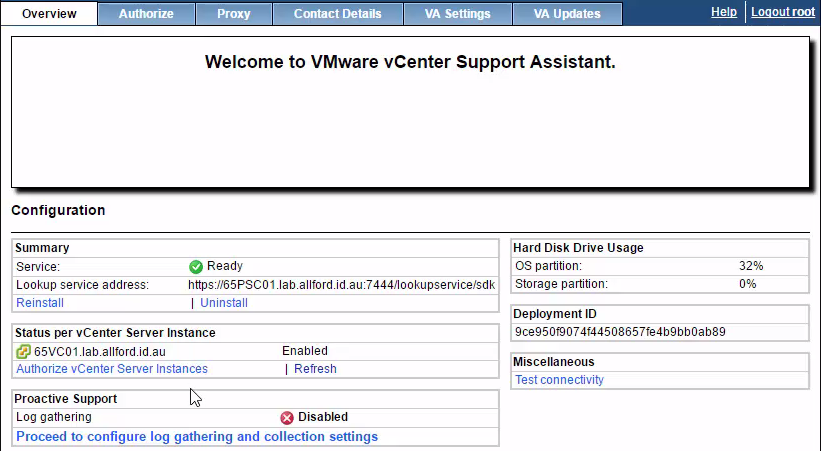
After authorisation is complete, you will be taken to an Overview screen. There are multiple tabs at the top that you can browse through to configure the appliance, register other vCenter Servers, change networking configurations and also perform updates of the appliance when new updates are released by VMware. Check out the video at the top of this post for a quick walkthrough of each tab.
We’ve now deployed the Support Assistant appliance and have authorised vCenter Server(s). It’s time to jump into the vSphere Web Client to check out the plugin.
Exploring the Plugin
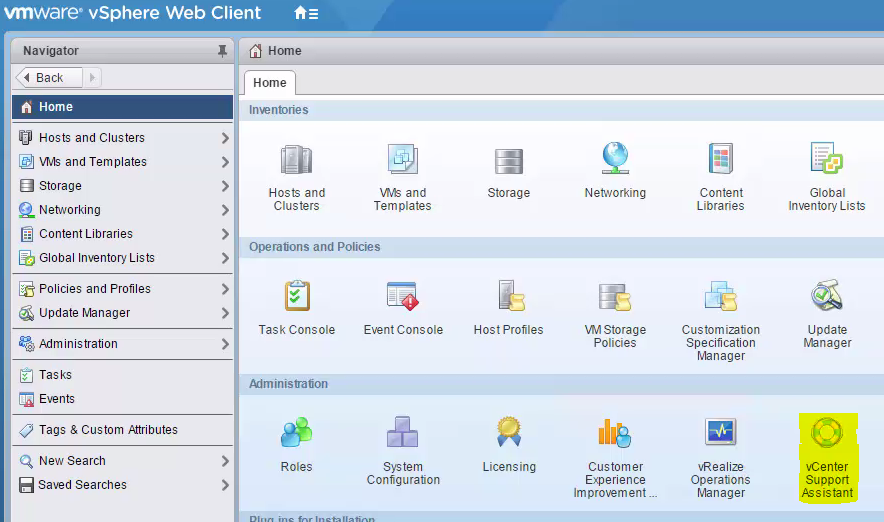
When you next log in to the vSphere Web Client, you’ll notice a new icon on the home screen for vCenter Support Assistant. Click on this to manage and monitor Support Assistant.
Manage Proactive Support
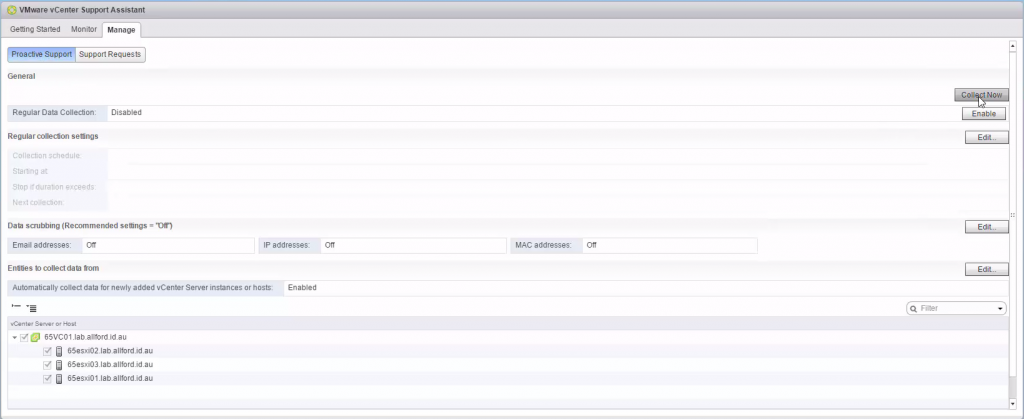
Let’s go ahead and check out the Manage tab first. Specifically the Manage > Proactive Support section.
This is where we can enable or disable the regular data collection, as well as enter settings for the automatic data collection.
There is a Collect Now button which allows you to manually scan the environment on demand.
You can Enable / Disable regular data collection.
After enabling regular data collection, there are 3 main configurations that can be set:
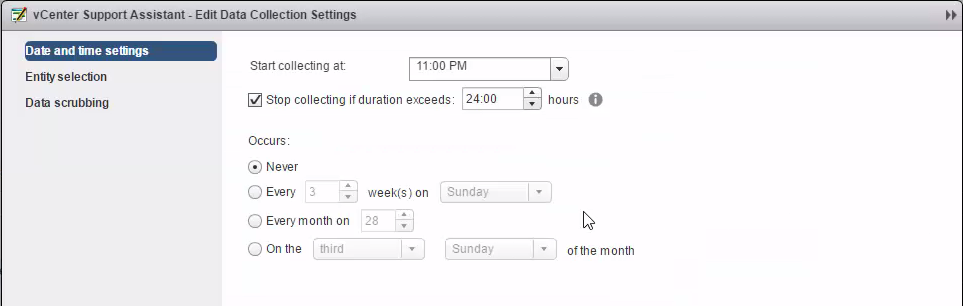
- Date and Time Settings. This is reasonably self explanatory. In here you can define the schedule as to when the automatic data collection will run in your environment
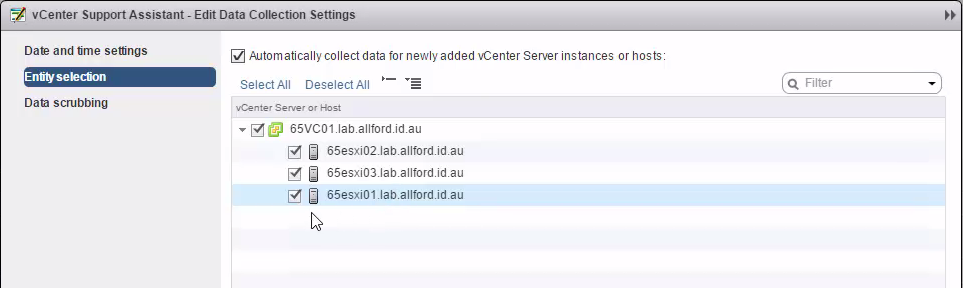
- Entity Selection. On this screen you can choose which vCenter Servers and ESXi hosts you want to include in the automatic data collection scans. If you have a number of ESXi hosts that for some reason yo do not want included, you can uncheck the box here. Also note at the top there is an option to Automatically collect data for newly added vCenter Server instances or hosts. By default this is checked, so new entities added to the environment will be included in data collection automatically
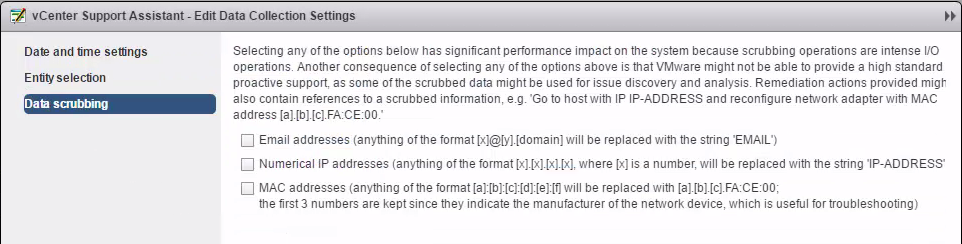
- Data Scrubbing. VMware provide the option to obfuscate email addresses, IP addresses and MAC addresses from the automatic data collection and the upload to VMware. If you have a requirement to protect this data then you can use these options. As noted in the interface, this can add a performance impact and may also limit the helpfulness of automatic reports for issues in your environment
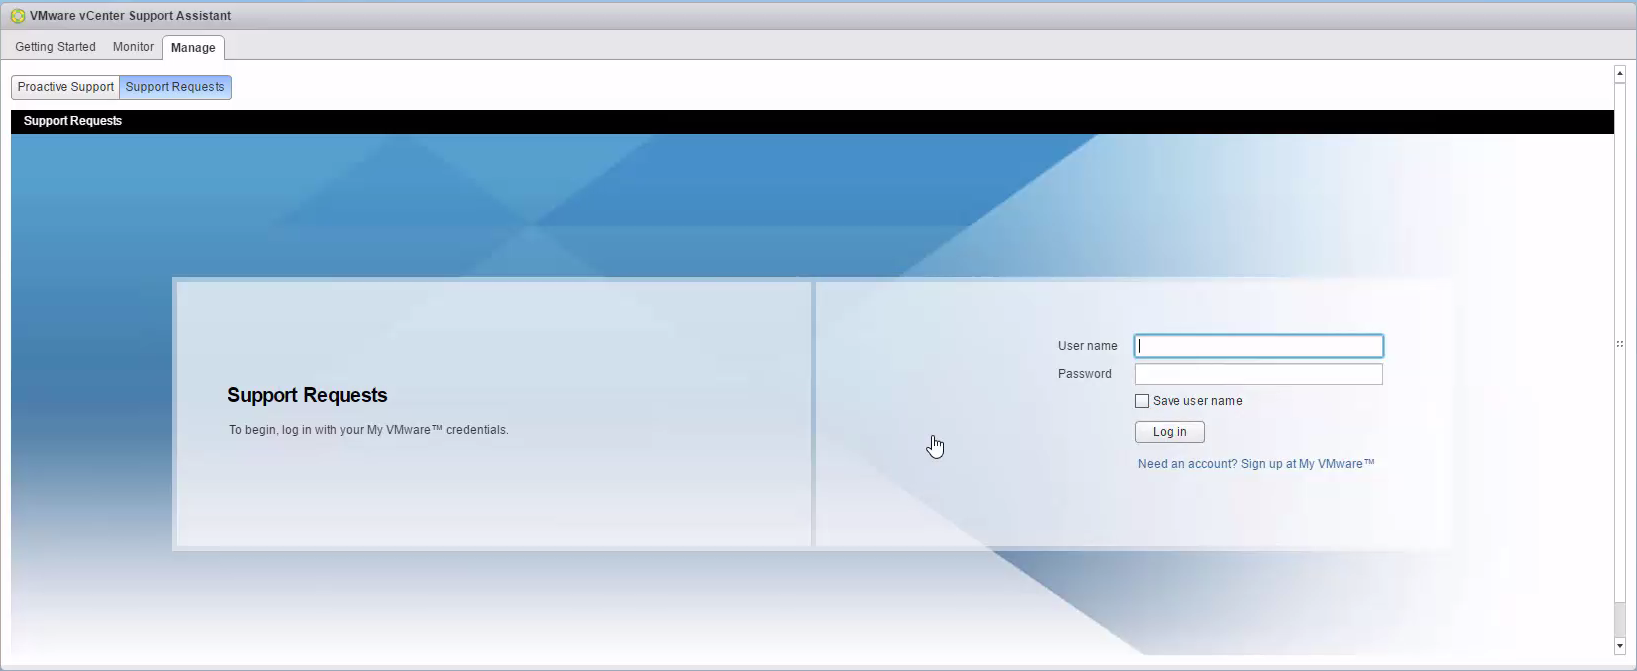
Manage Support Requests
The other option under Manager is for Support Requests. This is where you can log reactive support tickets with VMware. If you click on this tab you will see a login screen, which is a login to My VMware. Enter your credentials and click login to proceed.
I didn’t have internet access in this lab so I’m unable to grab any other screenshots at this point in time, but after logging in you will see the accounts you have authority for. You can pick an account and then log a support request. After entering the normal details for a SR such as description, severity and contact details, you can log the SR. Directly after you log the SR, Support Assistant will ask you if you want to upload logs. If you select yes, you are given a visual display of your environment and you can select vCenter Servers / ESXi hosts. Select the components you want to grab logs for and click OK. Support Assistant will then generate the log bundles for the selected entities and upload these to VMware, all automatically as a background task.
This is a pretty cool time saver.
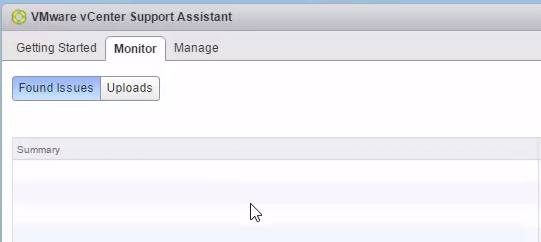
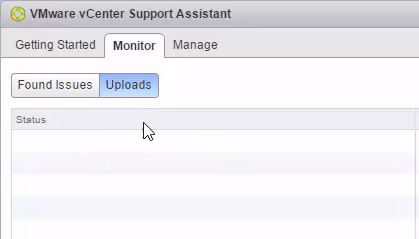
Monitor
If we have a look at the Monitor tab, there are two sub menus.
- Found Issues. This is a list of any issues in your environment that have been found by the Support Assistant. You can come here at any time to see if any issues have been identified. These will also be included in the monthly summary email
- Uploads. This is simply a place you can come to to monitor the status of uploads of the proactive scan data to VMware. You’ll be provided with the status, timestamps of upload and whether or not any data was obfuscated
Summary
I think the Support Assistant plugin is a great tool to have and there is no reason not to deploy it. In my opinion it is the easiest way to create a SR and get logs and extra attachments quickly generated and uploaded without any extra manual work or uploading via FTP, even though there is now an option in the web client to upload a file to an existing SR. I’m not yet sold on the proactive support side of things, I didn’t have much come out of this when I was working for a customer, but I’m interested to explore this further and see if we can extract more value for our customers with the proactive support. At the end of the day, it is a free appliance - go ahead and download and configure it in your environment! Are you a fan of the Support Assistant? Let me know in the comments below.